How to connect Seamaty SD1 with MedX Automation
MedX Automation connects with the Seamaty SD1 Auto Dry Biochemistry Analyzer using the HL7 protocol over TCP/IP. The SD1 transmits results as HL7 messages over the network, which the Automation application receives and processes automatically.
This guide assumes you have already installed the MedX Automation application and added the Seamaty SD1 as a device. See How to connect medical devices with MedX Automation for more details on the initial setup.
Connecting using the Network
The Seamaty SD1 communicates with MedX Automation over TCP/IP. You will need to connect both the computer running the Automation application and the SD1 analyzer to the same network. The SD1 supports Ethernet and WiFi connectivity — use whichever is appropriate for your facility setup.
Network Configuration
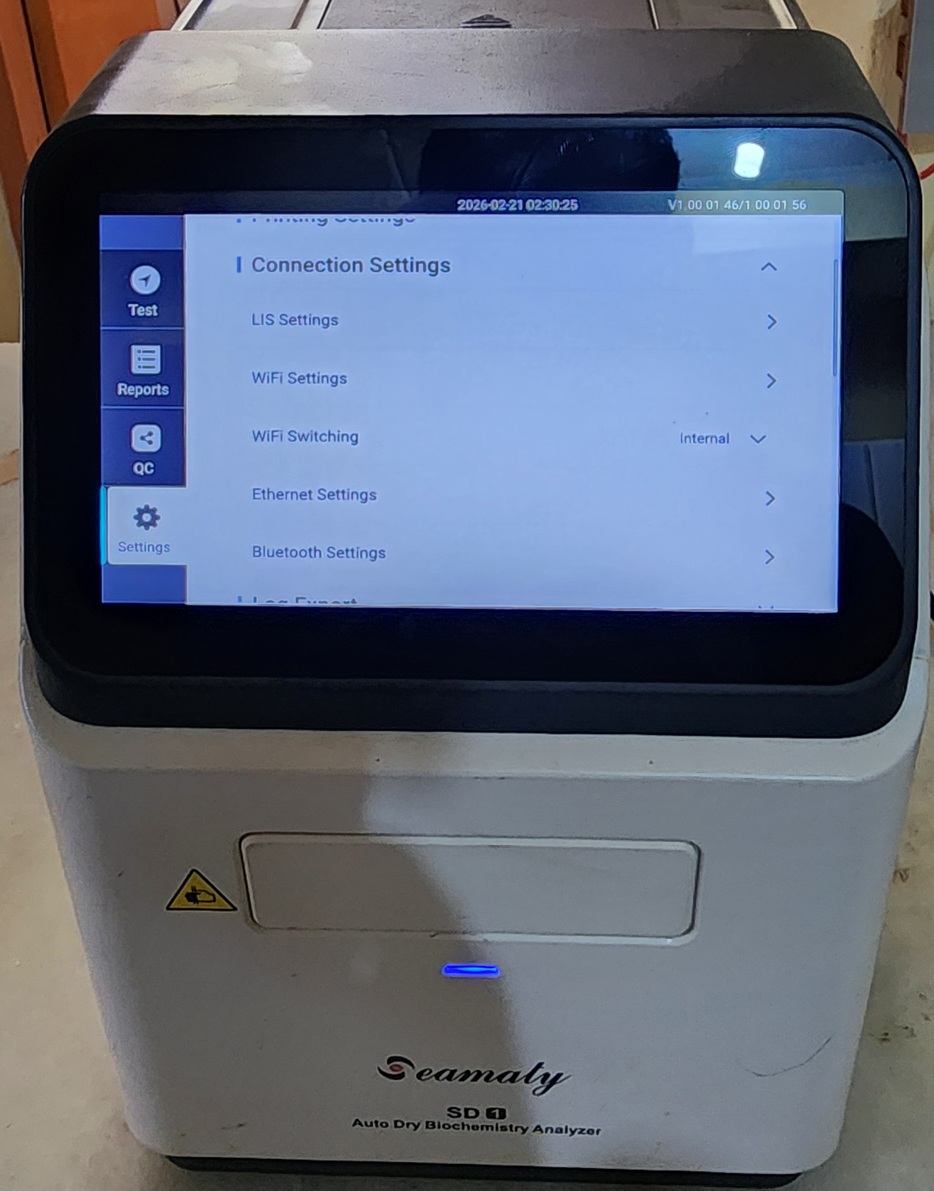
- On the SD1 analyzer, tap Settings on the left sidebar.
- Scroll down to Connection Settings and expand it. You will see the following options:
- LIS Settings — configure the LIS server connection
- WiFi Settings — configure WiFi network parameters
- Ethernet Settings — configure wired network parameters
- Tap Ethernet Settings (recommended) or WiFi Settings to configure the network.
- For Ethernet, connect the SD1 to your network using an Ethernet cable and configure:
- IP Address: Assign a static IP or enable DHCP. Contact your network administrator for the appropriate settings.
- Subnet Mask: Set according to your network (typically
255.255.255.0). - Gateway: Set to your network's default gateway.
- Save the settings.
Configuring Communication
Once the SD1 is on the network, configure it to send results to the Automation application:
- From Settings > Connection Settings, tap LIS Settings.
- Under Basic Settings, configure the following:
- Start LIS: Toggle ON to enable the LIS connection.
- Upload result after test: Toggle ON to automatically send results after each test completes.
- Connection method: Select Network from the dropdown.
- Under Network, set:
- Server Address: Enter the IP address displayed in the MedX Automation application (e.g.,
192.168.0.10). - Server Port: Enter the port displayed in the Automation application (e.g.,
5125).
- Server Address: Enter the IP address displayed in the MedX Automation application (e.g.,
- Tap Back to save and return.

On the Automation application side:
- Click the settings (gear) icon in the top-right corner of the machine page.
- The application will display the IP address and port it is listening on. Ensure these match the Server Address and Server Port configured on the SD1.
- Once the analyzer connects, the status should change from PENDING to CONNECTED.
Ensure that any firewall on the computer allows incoming TCP connections on the port used by the Automation application.
Sending Results
Auto-Sending Results
The SD1 can be configured to automatically transmit results to the LIS once a test run is completed:
- On the SD1 analyzer, go to Settings > Connection Settings > LIS Settings.
- Toggle Upload result after test to ON.
- Once enabled, completed test results will be automatically transmitted to the Automation application without manual intervention.
Manually Sending Results
If auto-send is not enabled, or you need to re-send older results:
- On the SD1 main screen, navigate to the Sample or Data menu.
- Select the result(s) you wish to transmit.
- Press Send (or Upload to LIS) to transmit the selected records to the Automation application.
- The results should appear in the Results tab of the Automation application.
Troubleshooting
| Issue | Solution |
|---|---|
| Status stays on PENDING | Verify the IP address and port on the analyzer match the Automation app. Check that both devices are on the same network. |
| No results appearing | Ensure the LIS connection is enabled on the analyzer and that auto-send is turned on or results are sent manually. |
| Connection drops intermittently | Check the Ethernet cable and network switch. Ensure the analyzer has a stable static IP or a DHCP reservation. |
| Firewall blocking connection | Allow incoming TCP connections on the Automation port in the Windows Firewall settings. |