How to connect HumaCount with MedX Automation
MedX Automation connects with the Human HumaCount using serial communication via the USB B port or TCP/IP via the network. The older HumaCount 30TS/60TS models use only serial while the newer HumaCount 30TS/80TS models use both serial and TCP/IP. The 5D, 5DCRP and 5L are currently not supported but can be added at request.
Depending on the method you have chosen to use, you will have to set it up differently. In either case, you must install the application on a computer connected to the machine via network or a USB B cable depending on the method you are using. This guide assumes you have installed the MedX Automation application and added the Human Humastar. See How to connect medical devices with MedX Automation for more details on this.
For more information about interfacing with the Human HumaCount, refer to the following manuals;
- HumaCount 30TS / 80TS LIS Interface Manual
- HumaCount 30TS / 60TS Service manual
Connecting with a USB B Cable
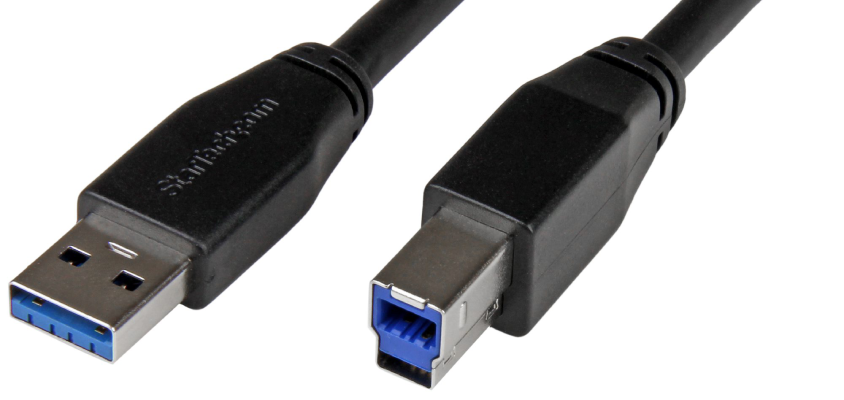
For the serial method, you will need a USB B to USB cable to connect the machine to the computer where you have installed the application. Use the port labelled 8 (USB B Inlet) to connect the cable.

Usually, the same cable provided to connect the machine to the printer can be used to connect it to a computer.
Configuring Communication
Once the cable is connected to both the computer and the machine, you should be able to continue the setup on the Automation application.
- Click the setting button on the top right and select a serial port corresponding to the cable you have connected. If you are not sure which one it is, unplug it, check which one is no longer in the dropdown and then reconnect and select the one that reappears.
- Once connected, the status should change from PENDING to CONNECTED. You can then proceed to send results from the machine.
When the computer has recognized the analyzer, it will enroll the (virtual) serial port as one of the COM ports of the PC. Please go to Device Manager and check the , and check the COM port ID. You might have to install appropriate drivers for it to be recognized. Refer to Configuration of serial port drivers for more information
Sending Results
- On the machine screen, select Database
- You will be presented with a list of results performed on the machine, select one or more that you want to output.
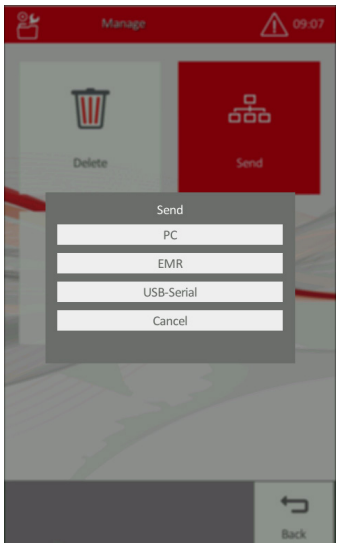
- Select the Mgmt button and click Send. You should be able to see results in the Results tab.
Auto-Sending Results
The machine can be configured to automatically send results once they are completed with the configuration below;
- On the machine's main menu, go to Settings > Measurement > Settings
- Ensure Auto Send is set to Enabled
Connecting using the Network
For the TCP/IP method, you will need to connect the computer and the machine to the same network. Use the port labelled 4 (Ethernet port) to connect the machine to the network using an Ethernet cable.

On the machine, go to settings. You will see an option for communication settings. The Communication settings menu is used to set up communication with external systems. It has two submenus available:
- Device communication – this menu
allows the operator to set up a network address or enable DHCP and other network settings. - Peer communication – under this menu, you can enable and disable different communication methods.
Network Configuration
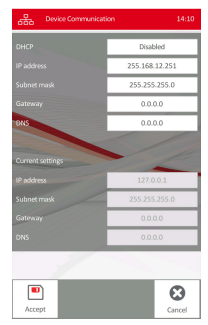
To configure the network, tap Device Communication in the Communication settings menu. Use one of the following configurations and click Accept.
- DHCP Enabled: If DHCP is enabled, the network router on the local network will automatically assign the machine an IP address. This is the recommended configuration
- DHCP Disabled: If DHCP is disabled, enter a valid
IP address, subnet mask, gateway and DNS to connect the device on the network. Contact the network administrator for details on the IP address in your facility network.
Configuring Communication
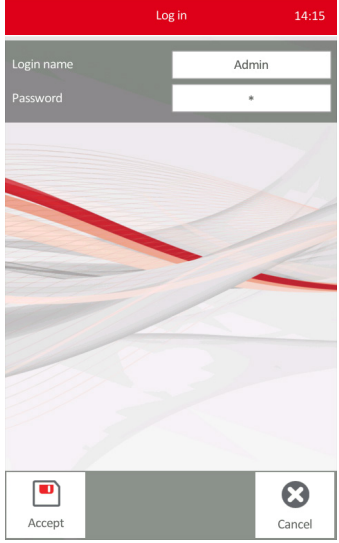
You may not be able to see some necessary fields unless you log in as SERVICE. You will need to "Logout Admin" and "Login Service"
- Tap the Exit menu and select Logout Admin.
- You will be presented with a login screen with the login name set to admin and an empty password. To change the login to service, you will need to tap the space below the password and above the accept/cancel button four times in sequence to form a rectangle. The password for the service account is usually 6484
- Once done using the service account, you can log in using the admin account. The password is usually 0
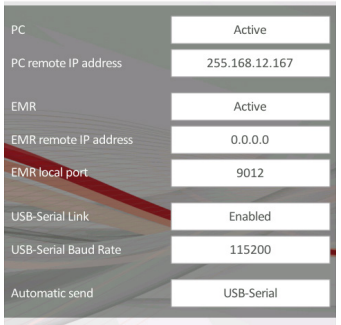
To configure communication, tap Peer Communication in the Communication settings menu.
- Ensure EMR is active
- Ensure the EMR remote IP address and EMR remote port match whatever is displayed in the Automation application as the IP address and port.
- Ensure Automatic send is set to one of the following to ensure results are automatically sent once completed.
- EMR (LIS) only: The remote EMR (LIS) connection will receive the results automatically.
- PC and EMR (LIS): Both receivers will get the results.
Sending Results
If Automatic send is enabled, the machine should be able to send results automatically to the automation application. However, you might want to send results manually, for example, to send older results or for any other reason.
- After selecting records in the database main
menu, press Manage and tap the Send button to transmit selected records. - The Send menu will appear, to select from connections enabled. Select the EMR connection to send the selected records